Wednesday, December 10, 2008

the process cont'd


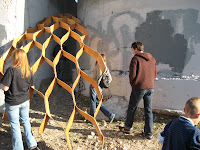
We had a total of seven individual modules which we put together in the shop at the university and later on site on the day of the big opening. It was a completely different experience assembling the installation at the shop than on site. We needed a lot more help, for one, hanging the installation at its final destination. Putting the holding cable in place around the silo was quite a task, and we would not have been able to do it without all the extra help we got the day of the opening.

the process


The longest part of the process was waiting for the vacuum bag to do its thing. The plywood had to be glued together and placed precisely in the right spot, then sit for about an hour for the glue to dry. Some of the pieces were clamped together to maximize our time.

Monday, December 8, 2008

My piece of the puzzle


After attempting several different infills for the cells, it was established that the material we truly wanted to use, fiberglass, was too much and out of our budget for us to finish before our deadline. We abandoned the infill and each person in the group adopted a specific piece of the whole ivy project. My piece was the "curved joiner"; a piece which curves down as well as bends to the sides as can be seen in the pictures.

After the midterm


After the midterm, the studio was split into two groups: the "ivy" and the "origami" groups. In the Ivy group, I was to be in charge of infilling the cells to further support the structure. My teammate and I tried several materials, from wire mesh and casting cloth, to concrete and plexiglass, to bolts and epoxy.

Sunday, October 19, 2008

making it


Putting the components together required a bit of experimenting. I tried molding insulation foam to form one of the seats in my field of points. I also mixed a batch of concrete to make a more solid seat, which might last outside longer than a couple days. I bolted the metal bases and made the connections stronger with these metal anchors I got a Lowes. Overall, the entire seat is very sturdy and I think will be able to stand a couple days out on the site.


Thursday, October 9, 2008

Bug skin


Yet another study shows how the shapes of the seats on the landscape came to be. Taking the shapes on the skin of a common bug, I generated this pattern and cut it to make each individual seat.

Cylinders


Another variation of my project are these cylinders which create a gradient from one corner to the opposite one. Using the same grid system as in my last studies, I varied the heights of each cylinder as the slope of the landscape got higher and toward the wall.

Tuesday, October 7, 2008


The next step in the process is to experiment with components and materials. This "landscape" of seats I found in the skin of an insect.
I then took the pattern and imitated it onto the point field I previously layed out on the site. This small scale model is made with cardboard. Next I will move on to do some cast models with silicone and also mix that with wood.

Wednesday, September 24, 2008

Beginning of team


The next step in the process is to merge concepts and ideas with some of the other members of the EFab studio to form groups and begin physically making components for the future installation(s). I have joined forces with a couple students who are into this "venation" or "branching" process. Joining our ideas, I think we can come up with a grid system to begin working with. The specific site chosen for this project is the slope area close to the silos by the 3' retention wall facing the bayou. We chose this space because of the interesting slope situation. I think that alone will affect the grid system we come up with, creating a unique condition for the installation. After the grid has been established, we will begin to make a pattern, a sort of branching along the points on the grid that will be our location where to place the seats. Since we are still interested in creating shading, only some of the seats will have a type of canopy branching out and up from the same seats created. These will have to be light-weight, which is why we are leaning toward using cardboard, as opposed to some other heavy material.
Process


I started off thinking I wanted to do casting for this project, as I'm doing a point system with seating for joggers. Small samples consisted of Plaster of Paris cast in egg cartons. I learned that casting is not as simple as it may seem. The drying of the samples took longer than expected. I had to cast in small batches because the mix kept hardening before I wanted it to. Overall, it was a good learning experience. I'm still thinking of using casting, but since we're now moving to group work, I'll have to work it out with the rest of the members. Wood or cardboard might be good options.

Wednesday, August 27, 2008

I was looking at a picture of fungi growing on the side of a tree. Looking at our site, I can't help but notice the shape of the silos: it's almost like 4 trees growing side by side.
Could we possibly do like fungi and grow on the side of those silos?
just a thought